2016年10月5日 星期三

CollectionViewController的應用

先在sotryboard內建立一個collectionviewcontroller
然後再建立一個繼承於UICollectionViewController的class
而此class會幫你建立好cell,但我個人將它移除後自己寫過,也可用系統建立的。
其餘不多說拉!以下看code


import UIKit


class MenuViewController: UICollectionViewController,UICollectionViewDelegateFlowLayout {

    
    override func viewDidLoad() {
        super.viewDidLoad()

      
    }

    override func didReceiveMemoryWarning() {
        super.didReceiveMemoryWarning()
       
    }


    override func collectionView(_ collectionView: UICollectionView, numberOfItemsInSection section: Int) -> Int {
       
        return 20
    }

    override func collectionView(_ collectionView: UICollectionView, cellForItemAt indexPath: IndexPath) -> UICollectionViewCell {

        let cell = collectionView.dequeueReusableCell(withReuseIdentifier: "cell", for: indexPath) as! MenuViewCell;
        
        cell.layer.cornerRadius = 10//給cell圓角
        cell.nameLabel.text = "這是第\(indexPath.row)個cell"
        // Configure the cell
    
        return cell
    }
    override func collectionView(_ collectionView: UICollectionView, didSelectItemAt indexPath: IndexPath) {
        
        let row = indexPath.row
        print(row)
        
    }

//MARK: CELL內容

    //計算cell上下高
    func collectionView(_ collectionView: UICollectionView, layout collectionViewLayout: UICollectionViewLayout, sizeForItemAt indexPath: IndexPath) -> CGSize{
        let size:CGSize = CGSize(width: self.view.frame.size.width/2-12, height: (self.view.frame.size.width/2-12)/1.5);

        return size
    }
    //計算cell上下高
    func collectionView(_ collectionView: UICollectionView, layout collectionViewLayout: UICollectionViewLayout, minimumLineSpacingForSectionAt section: Int) -> CGFloat{
        return 10
    }
    //計算cell左右寬度
    func collectionView(_ collectionView: UICollectionView, layout collectionViewLayout: UICollectionViewLayout, minimumInteritemSpacingForSectionAt section: Int) -> CGFloat
    {
        return 5
    }
    //cell上下左右留邊
    func collectionView(_ collectionView: UICollectionView, layout collectionViewLayout: UICollectionViewLayout, insetForSectionAt section: Int) -> UIEdgeInsets{
        return UIEdgeInsetsMake(10, 6, 10, 6);
    }


呈現出來的效果如下

2016年10月3日 星期一

註冊頁面(SWIFT3)

這邊要製作的是註冊頁面,如需登入的朋友們請到http://h81061678.blogspot.com/2016/10/swift3.html
在這跟註冊一樣使用了email格式盼斷,textfield的判斷(return動作)及監聽動作

不多說了一樣先放上code給大家參考

import UIKit

class RegisteredViewController: UIViewController,UITextFieldDelegate {
    
    @IBOutlet weak var TopView: UIView!
    @IBOutlet weak var registeredBtn: UIButton!
    @IBOutlet weak var AgreeBtn: UIButton!
    @IBOutlet weak var eMailField: UITextField!
    @IBOutlet weak var PasswordField: UITextField!
    @IBOutlet weak var PasswordCKField: UITextField!
    @IBOutlet weak var NicknameField: UITextField!
    @IBOutlet weak var BirthyearField: UITextField!
    @IBOutlet weak var BirthmonthField: UITextField!
    @IBOutlet weak var BirthdayField: UITextField!
    
    var UserDef:UserDefaults!
    var agreeCK:Bool!
    var singleFingerTap:UITapGestureRecognizer!
    
    override func viewDidLoad() {
        super.viewDidLoad()
        //監聽鍵盤動作
        NotificationCenter.default.addObserver(self, selector: #selector(LoginViewController.keyboardWasShown), name: NSNotification.Name.UIKeyboardWillShow, object: nil);
        NotificationCenter.default.addObserver(self, selector: #selector(LoginViewController.keyboardWasHidden), name: NSNotification.Name.UIKeyboardWillHide, object: nil);
        singleFingerTap = UITapGestureRecognizer.init(target: self, action: #selector(handleSingleTap));
        
        agreeCK = false;
        UserDef = UserDefaults.standard
        UserDef.set(agreeCK, forKey: "ck");
        
        AgreeBtn.layer.borderWidth = 1.5;
        AgreeBtn.layer.borderColor = UIColor(red: 77/255, green: 77/255, blue: 77/255, alpha: 1).cgColor
        registeredBtn.layer.cornerRadius = 5;
        
        self.eMailField.delegate = self;
        self.PasswordField.delegate = self;
        self.PasswordCKField.delegate = self;
        self.NicknameField.delegate = self;
        eMailField.clearButtonMode = .always;
        PasswordField.clearButtonMode = .always;
        PasswordCKField.clearButtonMode = .always;
        NicknameField.clearButtonMode = .always;
       
        
    }
    
    override func didReceiveMemoryWarning() {
        super.didReceiveMemoryWarning()
        // Dispose of any resources that can be recreated.
    }
    
    override func viewWillAppear(_ animated: Bool) {
        super.viewWillAppear(animated)
        self.navigationController?.isNavigationBarHidden = false
    }
    
    @IBAction func AgrddBtn(_ sender: UIButton) {
        if (UserDef.bool(forKey: "ck") == false){
            agreeCK = true;
            UserDef.set(agreeCK, forKey: "ck");
            print(UserDef.bool(forKey: "ck"))
            AgreeBtn.setBackgroundImage(UIImage(named:"tick"), for: .normal)
        }else{
            agreeCK = false;
            UserDef.set(agreeCK, forKey: "ck");
            print(UserDef.bool(forKey: "ck"))
            AgreeBtn.setBackgroundImage(UIImage(named:""), for: .normal)
            AgreeBtn.backgroundColor = UIColor.white;
        }
    }
    
    
    @IBAction func RegisteredBtn(_ sender: UIButton) {
        if(UserDef.bool(forKey: "ck")==true){
            if(eMailField.text != "" && PasswordField.text != "" && NicknameField.text != "" && BirthyearField.text != "" && BirthmonthField.text != "" && BirthdayField.text != "" && PasswordCKField.text != ""){
                if (self.isValidEmail(testStr: eMailField.text!) == false){
                    print("信箱格式錯誤");
                    let alertcontroller = UIAlertController(title: "Error", message: "The mailbox is malformed", preferredStyle: .alert);
                    let alertAction = UIAlertAction(title: "OK", style: .default, handler: nil);
                    alertcontroller.addAction(alertAction)
                    self.present(alertcontroller, animated: true, completion: nil)
                }else{
                    if(PasswordCKField.text == PasswordField.text){
//                        print(PasswordField.text?.characters.count)
                        if((PasswordField.text?.characters.count)! < 6 || (PasswordField.text?.characters.count)! > 12){
                            let alertcontroller = UIAlertController(title: "Error", message: "The character should be between 6 and 12", preferredStyle: .alert);
                            let alertAction = UIAlertAction(title: "OK", style: .default, handler: nil);
                            alertcontroller.addAction(alertAction)
                            self.present(alertcontroller, animated: true, completion: nil)
                            print("密碼未介於6~12之間")
                        }else{
                            //註冊成功
                            print("註冊")
                        }
                       
                    }else{
                        let alertcontroller = UIAlertController(title: "Error", message: "The passwords do not match", preferredStyle: .alert);
                        let alertAction = UIAlertAction(title: "OK", style: .default, handler: nil);
                        alertcontroller.addAction(alertAction)
                        self.present(alertcontroller, animated: true, completion: nil)
                    }
                    
                }
            }else{
                if(eMailField.text == ""){
                    eMailField.attributedPlaceholder = NSAttributedString(string: "Please enter email", attributes: [NSForegroundColorAttributeName: UIColor.red]);
                }
                if(PasswordField.text == ""){
                    PasswordField.attributedPlaceholder = NSAttributedString(string: "Please enter password", attributes: [NSForegroundColorAttributeName: UIColor.red]);
                }
                if(PasswordCKField.text == ""){
                    PasswordCKField.attributedPlaceholder = NSAttributedString(string: "Please enter password confirm", attributes: [NSForegroundColorAttributeName: UIColor.red]);
                }
                if(NicknameField.text == ""){
                    NicknameField.attributedPlaceholder = NSAttributedString(string: "Please enter nickname", attributes: [NSForegroundColorAttributeName: UIColor.red]);
                }
                if(BirthyearField.text == "" || BirthmonthField.text == "" || BirthdayField.text == ""){
                    let alertcontroller = UIAlertController(title: "Error", message: "Please enter your borthday", preferredStyle: .alert);
                    let alertAction = UIAlertAction(title: "OK", style: .default, handler: nil);
                    alertcontroller.addAction(alertAction)
                    self.present(alertcontroller, animated: true, completion: nil)
                }
                
            }
        }else{
            let alertcontroller = UIAlertController(title: "Error", message: "Please agree membership terms", preferredStyle: .alert);
            let alertAction = UIAlertAction(title: "OK", style: .default, handler: nil);
            alertcontroller.addAction(alertAction)
            self.present(alertcontroller, animated: true, completion: nil)
        }
    }
    // MARK: e-Mail檢查
    func isValidEmail(testStr:String) -> Bool {
        // print("validate calendar: \(testStr)")
        let stricterFilter:Bool = false;
        
        let stricterFilterString:String = "[A-Z0-9a-z\\._%+-]+@([A-Za-z0-9-]+\\.)+[A-Za-z]{2,4}"
        let laxString:String = ".+@([A-Za-z0-9-]+\\.)+[A-Za-z]{2}[A-Za-z]*"
        let emailRegex:String = stricterFilter ? stricterFilterString : laxString;
        let emailTest = NSPredicate(format:"SELF MATCHES %@", emailRegex)
        return emailTest.evaluate(with: testStr)
    }
    
    
    // MARK: TEXTField按下鍵盤return後動作
    func textFieldShouldReturn(_ textField: UITextField) -> Bool {
        textField.resignFirstResponder()
        if(textField.isEqual(eMailField)){
            PasswordField.becomeFirstResponder()
        }else if(textField.isEqual(PasswordField)){
            PasswordCKField.becomeFirstResponder()
        }else if(textField.isEqual(PasswordCKField)){
            NicknameField.becomeFirstResponder()
        }else if(textField.isEqual(NicknameField)){
            NicknameField.resignFirstResponder()
        }
        return true;
    }
    //MARK: 鍵盤監聽動作(當用戶點view收起)
    func keyboardWasShown(){
        TopView.addGestureRecognizer(singleFingerTap);
    }
    func keyboardWasHidden(){
        TopView.removeGestureRecognizer(singleFingerTap);
    }
    func handleSingleTap(){
        //Do stuff here...
        eMailField.resignFirstResponder()
        PasswordField.resignFirstResponder()
        PasswordCKField.resignFirstResponder()
        NicknameField.resignFirstResponder()

    }

以下附上大概的介面圖剩下就交由大家自己去測試摟!!!


登入頁面(SWIFT3)

今天製作了登入頁面,登入頁面比較簡單沒有太複雜的物件。以下先呈現code

import UIKit

class LoginViewController: UIViewController,UITextViewDelegate,UITextFieldDelegate {
    
    @IBOutlet weak var TopView: UIView!
    @IBOutlet weak var PasswordField: UITextField!
    @IBOutlet weak var UserAccountField: UITextField!
    
    @IBOutlet weak var LogInBtn: UIButton!
    @IBOutlet weak var FB: UIButton!
    @IBOutlet weak var Google: UIButton!
    
    var singleFingerTap:UITapGestureRecognizer!
    
    override func viewDidLoad() {
        super.viewDidLoad()
        //監聽鍵盤動作
        NotificationCenter.default.addObserver(self, selector: #selector(LoginViewController.keyboardWasShown), name: NSNotification.Name.UIKeyboardWillShow, object: nil);
        NotificationCenter.default.addObserver(self, selector: #selector(LoginViewController.keyboardWasHidden), name: NSNotification.Name.UIKeyboardWillHide, object: nil);
        singleFingerTap = UITapGestureRecognizer.init(target: self, action: #selector(handleSingleTap));
        
        self.UserAccountField.delegate = self;
        self.PasswordField.delegate = self;
        UserAccountField.clearButtonMode = .always;
        PasswordField.clearButtonMode = .always;
        FB.layer.cornerRadius = 5;
        Google.layer.cornerRadius = 5;
        LogInBtn.layer.cornerRadius = 5;
        
    }
    
    override func didReceiveMemoryWarning() {
        super.didReceiveMemoryWarning()
        // Dispose of any resources that can be recreated.
    }
    
    override func viewWillAppear(_ animated: Bool) {
        super.viewWillAppear(animated)
        
        self.navigationController?.isNavigationBarHidden = true
    }
    
    @IBAction func LoginBtn(_ sender: UIButton) {
        
        if((UserAccountField.text != "") && (PasswordField.text != "")){
            if (self.isValidEmail(testStr: UserAccountField.text!) == false){
                print("信箱格式錯誤");
                let alertcontroller = UIAlertController(title: "Error", message: "The mailbox is malformed", preferredStyle: .alert);
                let alertAction = UIAlertAction(title: "OK", style: .default, handler: nil);
                alertcontroller.addAction(alertAction)
                self.present(alertcontroller, animated: true, completion: nil)
            }else{
                //都有值登入
                print("登入");
                
            }
        }else{
            //帳號密碼為空時
            if(UserAccountField.text == ""){
                UserAccountField.attributedPlaceholder = NSAttributedString(string: "Please enter email", attributes: [NSForegroundColorAttributeName: UIColor.red]);
            }
            if(PasswordField.text == ""){
                PasswordField.attributedPlaceholder = NSAttributedString(string: "Please enter password", attributes: [NSForegroundColorAttributeName: UIColor.red]);
            }
        }
    }


    @IBAction func FBBtn(_ sender: UIButton) {
        
    }
    
    
    @IBAction func GoogleBtn(_ sender: UIButton) {
        
    }
    
    // MARK: e-Mail檢查
    func isValidEmail(testStr:String) -> Bool {
        // print("validate calendar: \(testStr)")
        let stricterFilter:Bool = false;
        
        let stricterFilterString:String = "[A-Z0-9a-z\\._%+-]+@([A-Za-z0-9-]+\\.)+[A-Za-z]{2,4}"
        let laxString:String = ".+@([A-Za-z0-9-]+\\.)+[A-Za-z]{2}[A-Za-z]*"
        let emailRegex:String = stricterFilter ? stricterFilterString : laxString;
        let emailTest = NSPredicate(format:"SELF MATCHES %@", emailRegex)
        return emailTest.evaluate(with: testStr)
    }
    
    // MARK: TEXTField按下鍵盤return後動作
    func textFieldShouldReturn(_ textField: UITextField) -> Bool {
        textField.resignFirstResponder()
        if(textField.isEqual(UserAccountField)){
            PasswordField.becomeFirstResponder()
        }else{
            self.LoginBtn(.init(type: .custom))
        }
        return true;
    }
    //MARK: 鍵盤監聽動作(當用戶點view收起)
    func keyboardWasShown(){
        TopView.addGestureRecognizer(singleFingerTap);
    }
    func keyboardWasHidden(){
        TopView.removeGestureRecognizer(singleFingerTap);
    }
    func handleSingleTap(){
        //Do stuff here...
        UserAccountField.resignFirstResponder()
        PasswordField.resignFirstResponder()

    }


以上照著做就可以了喔!!測試圖片如下

下圖為按下login後print出來登入


下圖為判斷帳號(email)格式錯誤

希望能幫助到大家喔!!


2016年9月21日 星期三

判斷APP是否第一次開起(Swfit)

當我們要判斷用戶是否第一次開起APP時必須在APPDelegate的didFinishLauchingWithOptions下存取兩組BOOL進去userDefaults
再利用存進去的userDefaults做判斷
第一次啟動為true
之後將第二個BOOL變為false


  func application(_ application: UIApplication, didFinishLaunchingWithOptions launchOptions: [UIApplicationLaunchOptionsKey: Any]?) -> Bool {
        
判斷當"abcd"如果是false或是空時做什麼動作,如果不是空就跳到else也就是非第一次開起

        if(!UserDefaults.standard.bool(forKey: "abcd")){
            UserDefaults.standard.set(true, forKey: "abcd")
            UserDefaults.standard.set(true, forKey: "first")
            print("first")
        }else{
            UserDefaults.standard.set(false, forKey: "first")
            print("unfirst")
        }


        return true

    }

簡單的做個lable來測試是否有判斷成功(也可使用alert)
 override func viewDidLoad() {
        super.viewDidLoad()
    
        if (UserDefaults.standard.bool(forKey: "first")){

           let lable = UILabel(frame: CGRect(x: 50, y: 200, width: 200, height: 36))
            lable.text = "第一次開起"
            lable.backgroundColor = UIColor.red
            lable.textColor = UIColor.yellow
            self.view.addSubview(lable)
        }else{

            let lable = UILabel(frame: CGRect(x: 50, y: 200, width: 200, height: 36))
            lable.text = "非第一次開起"
            lable.backgroundColor = UIColor.blue
            lable.textColor = UIColor.white
            self.view.addSubview(lable)
        }
    }

下圖為測試結果


2016年9月12日 星期一

監聽動作 (Swift)

下列程式碼為簡單的監聽應用,監聽可運用在很多地方。

監聽函數NSNotificationCenter.defaultCenter().addObserver(<#T##observer: AnyObject##AnyObject#>,<-self
 selector: <#T##Selector#>, <-自定義的func名稱,記得前面要帶上#selector(controller名稱.func名稱)
name: <#T##String?#>, <-自定義一個名稱,當呼叫監聽時需要用到
object: <#T##AnyObject?#>)<-如沒有object動做時則為nil,目前我用到幾乎都是使用nil

呼叫監聽動作函數NSNotificationCenter.defaultCenter().postNotificationName(
<#T##aName: String##String#>,<-在監聽時自定義的名稱
object: <#T##AnyObject?#>)<-同監聽時的object

監聽動作函數有很多種可以選擇,使用時可多研究哪一種是你當下需求最好的。

Swift 3
import UIKit

class ViewController: UIViewController {

    @IBOutlet weak var label: UILabel!
    
    override func viewDidLoad() {
        super.viewDidLoad()
        // Do any additional setup after loading the view, typically from a nib.
        
//        當值行以下時進行監聽動作
        NotificationCenter.default.addObserver(self, selector: #selector(ViewController.leableText), name: NSNotification.Name(rawValue: "test"), object: nil)
        
    }

    override func didReceiveMemoryWarning() {
        super.didReceiveMemoryWarning()
        // Dispose of any resources that can be recreated.
    }
    @IBAction func button(sender: UIButton) {
//        間聽到時值行該動作
        NotificationCenter.default.post(name: NSNotification.Name(rawValue: "test"), object: nil);
    
    }

    func leableText(){
        label.text = "監聽";
        label.textColor = UIColor.blue
        label.backgroundColor = UIColor.red
    }

}

Swift2.3
import UIKit

class ViewController: UIViewController {

    @IBOutlet weak var label: UILabel!
    
    override func viewDidLoad() {
        super.viewDidLoad()
        
        
//        當值行以下時進行監聽動作
        NSNotificationCenter.defaultCenter().addObserver(self, selector: #selector(ViewController.leableText), name: "test", object: nil)
    }

    override func didReceiveMemoryWarning() {
        super.didReceiveMemoryWarning()
        // Dispose of any resources that can be recreated.
    }
    @IBAction func button(sender: UIButton) {
//        間聽到時值行該動作
        NSNotificationCenter.defaultCenter().postNotificationName("test", object: nil);
    }

    func leableText(){
        label.text = "監聽";
        label.textColor = UIColor.blueColor()
        label.backgroundColor = UIColor.redColor()
    }
}


執行動作前如下圖
因viewDidLoad設定了監聽,
所以APP一執行時就進行了監聽func leableText()裡面要執行的程序
當點擊button則執行監聽動作如下圖


UserDefaults 資料存取(Swift)

存取欄位資料
Swift 3

2016/11/16補充
今天補充swift3在其他class時使用UserDefaults取出原本以存入的資料
首先可先建立一個新的class,在這我直接建立兩個新的label及一個button
button內所做的就是將原本前一個class已經輸入的資料呼叫出來並輸入新建立的label
當我們存入資料時是使用UserDefaults.standard.setValue(Any?, forKey: String)
呼叫資料時使用UserDefaults.standard.string(forKey: String)

@IBOutlet weak var passwordLabel: UILabel!

@IBOutlet weak var IdLabel: UILabel!

 @IBAction func loadingBtn(_ sender: UIButton) {
        IdLabel.text = UserDefaults.standard.string(forKey: "id")
        passwordLabel.text = UserDefaults.standard.string(forKey: "pas")
    }
-------------------------------------------------虛線以上為補充----------------------------------------------------

import UIKit


class ViewController: UIViewController,UITextFieldDelegate {
    
    
    @IBOutlet weak var ID: UITextField!
    @IBOutlet weak var PassWord: UITextField!
    
    var UserDef:UserDefaults!
    var Id:String!
    var pas:String!
    var info:String!
    var info2:String!
    
    
    override func viewDidLoad() {
        super.viewDidLoad()
        // Do any additional setup after loading the view, typically from a nib.
        ID.delegate = self
        PassWord.delegate = self
        //        ID.enablesReturnKeyAutomatically = true
        //        PassWord.enablesReturnKeyAutomatically = true
        UserDef = UserDefaults.standard
        
        
    }
    
    override func didReceiveMemoryWarning() {
        super.didReceiveMemoryWarning()
        // Dispose of any resources that can be recreated.
    }
    
    @IBAction func OKButton(sender: UIButton) {
        
        Id = ID.text;
        pas = PassWord.text;
        UserDef.setValue(Id, forKey: "id")
        UserDef.setValue(pas, forKey: "pas")
        
        
        info = UserDef.string(forKey: "id");
        info2 = UserDef.string(forKey: "pas");
        
        //        print(info)
        //        print(info2)
        
        
    }
    
    @IBAction func PrintButton(sender: UIButton) {
        
        let leable:UILabel = UILabel.init(frame: CGRect(x: 50, y: 200, width: 100, height: 36));
        leable.backgroundColor = UIColor.red
        
        let leable2:UILabel = UILabel.init(frame: CGRect(x: 50, y: 237, width: 100, height: 36));
        leable2.backgroundColor = UIColor.red


        if let userID = UserDef.string(forKey: "id"){
            
            leable.text = userID
            self.view.addSubview(leable);
            
        }else{
            leable.backgroundColor = UIColor.blue
            
        }
        if let aaa = UserDef.string(forKey: "pas"){
            leable2.text = aaa
            self.view.addSubview(leable2)
        }else{
            leable2.backgroundColor = UIColor.blue
        }
        
    }
}


Swift 2.3

import UIKit


class ViewController: UIViewController,UITextFieldDelegate {
    
    
    @IBOutlet weak var ID: UITextField!
    @IBOutlet weak var PassWord: UITextField!
    
    var UserDef:NSUserDefaults!
    var Id:String!
    var pas:String!
    var info:String!
    var info2:String!
    
    
    override func viewDidLoad() {
        super.viewDidLoad()
        // Do any additional setup after loading the view, typically from a nib.
        ID.delegate = self
        PassWord.delegate = self
//        ID.enablesReturnKeyAutomatically = true
//        PassWord.enablesReturnKeyAutomatically = true
        UserDef = NSUserDefaults.standardUserDefaults()
        
        
    }
    
    override func didReceiveMemoryWarning() {
        super.didReceiveMemoryWarning()
        // Dispose of any resources that can be recreated.
    }
    
    @IBAction func OKButton(sender: UIButton) {
        
        Id = ID.text;
        pas = PassWord.text;
        UserDef.setValue(Id, forKey: "id")
        UserDef.setValue(pas, forKey: "pas")
        
        
         info = UserDef.stringForKey("id");
         info2 = UserDef.stringForKey("pas");
        
        print(info)
       print(info2)
        
        
    }
    
    @IBAction func PrintButton(sender: UIButton) {
        
        let leable:UILabel = UILabel.init(frame: CGRect(x: 50, y: 200, width: 100, height: 36));
        leable.backgroundColor = UIColor.redColor()
        
        let leable2:UILabel = UILabel.init(frame: CGRect(x: 50, y: 237, width: 100, height: 36));
        leable2.backgroundColor = UIColor.redColor()


        if let userID = UserDef.stringForKey("id"){
           
            leable.text = userID
            
        self.view.addSubview(leable);
        
        }else{
        leable.backgroundColor = UIColor.blueColor()
            
        }
        if let aaa = UserDef.stringForKey("pas"){
            leable2.text = aaa
            self.view.addSubview(leable2)
        }else{
            leable2.backgroundColor = UIColor.blueColor()
        }
        
    }

}

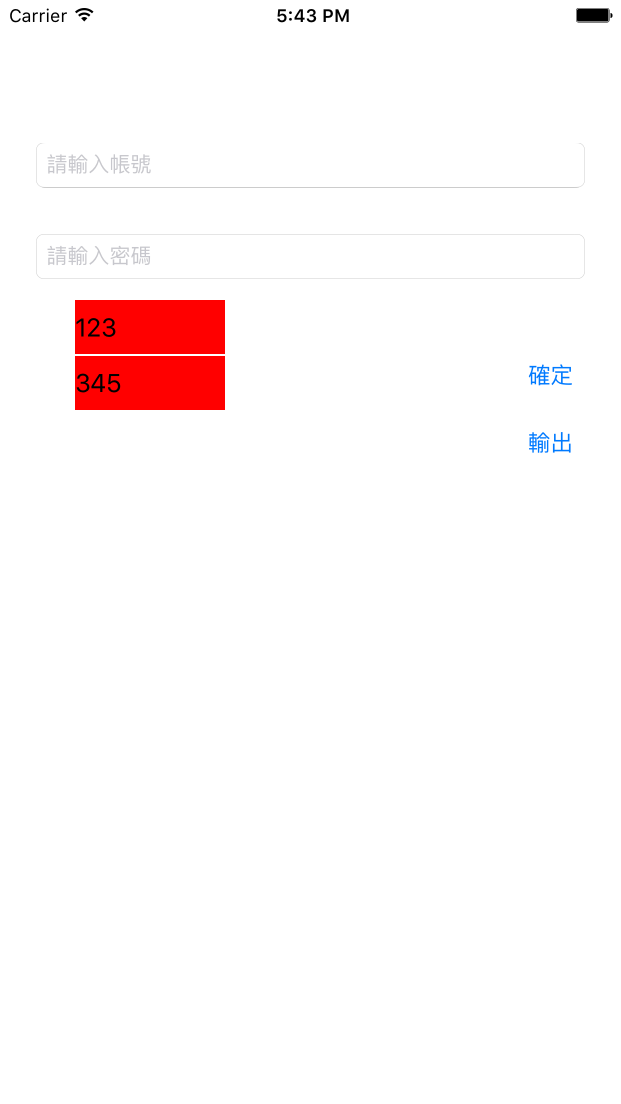
第一次輸入後畫面如下
 將APP玩全關必後開起在值接按書出後顯是如下


如按下輸出後沒顯示出來label被景為藍色時表示存取沒有成功或資料是空